Inkodye
I am so excited for my second guest blog post for the Purl Bee today! As a child I loved making sun prints, and as a mom I have bought sunprint paper many times for my kids. So when I discovered Inkodye Light Sensitive Dyes, I couldn't wait to try them! Instead of paper, Inkodye harnesses the power of the sun to create images on fabric. For me this is definitely an exciting development!
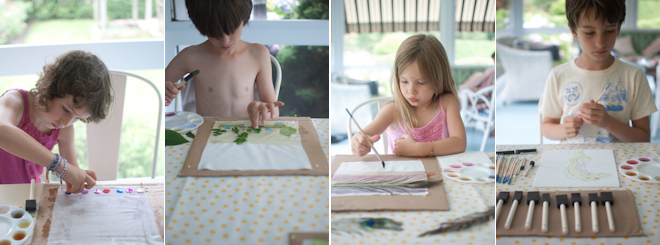
I knew the kids would enjoy trying Inkodye too so we set up a big table, gathered our supplies, and got ready to experiment. I cut a yard of Moda's muslin into a few sizes - I was not extremely careful in the cutting but my pieces were roughly 6x8, 10x13, and 6x18. I wanted small pieces in a variety of sizes to experiment with knowing that I might sew them back togehter again into a quilted piece of fabric. Having a lot of scraps to work with eliminated the pressure to get it "right" on the first try and kept us all loose and creative.
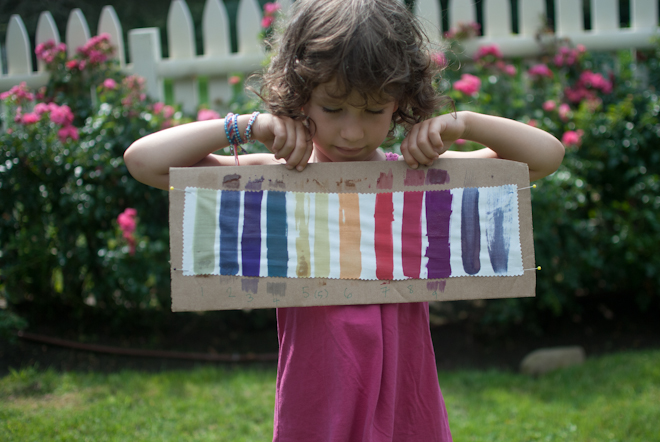
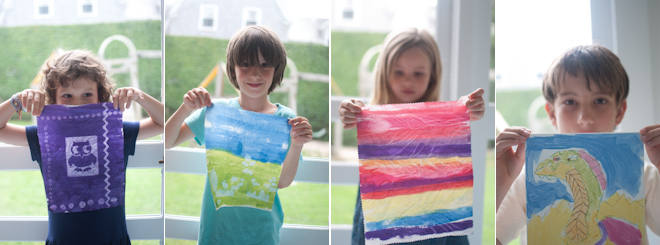
We started out by testing Inkodye's colors by painting some simple stripes. It was magical to watch the very pale stripes come alive the moment we stepped out into the sun. Although it takes about 10-12 minutes for the dyes to really set you start to see the colors very quickly the moment they hit the light. I really responded to the warm red tones that we got doing this first test so I used red and orange dyes for my project. Sometimes I mixed the two together, or added a little water, to get a variety of shades.
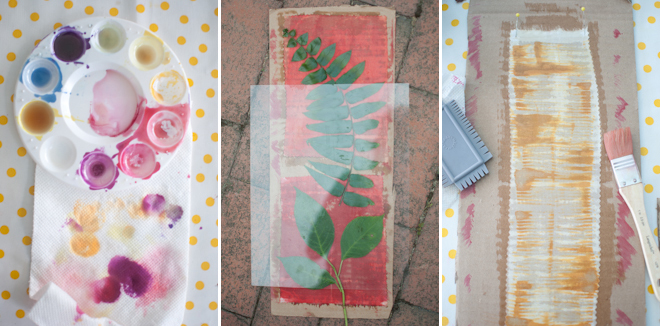
The next step was to get printing. We knew we wanted to play with botanicals and so snipped a few blossoms, leaves, and stems from our garden. Ferns and Japanese maple leaves made particularly nice prints but we also tried hydrangea leaves, a clematis vine, and some other flowers too. I was hoping to get subtle variations in the prints by letting the plants lie naturally on the fabric but it was a breezy day and that did not result in the best prints. I recommend placing a piece of plexiglass over the assemblage to keep it all in place, since even a little movement can really blur the image. I bought a cheap frame for $1.99 at Michael's and used the plexi from that to weigh down our leaves.
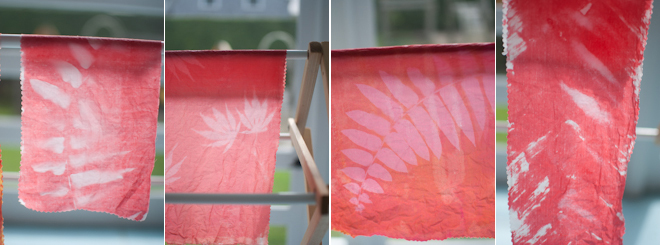
We all loved watching as each print evolved in the light, surprising us every time! For some designs I started by brushing on one color and exposing it before adding any leaves. After letting the fabric expose for 10 minutes I brushed on a second color and placed the leaves for a second 10-12 minutes of exposure. Even layering a lighter dye over a darker one gave some pretty and more subtle prints. For a few pieces I did not use any leaves but instead just experimented with brush stokes and pattern using a special comb. To get paler shades of color I diluted the dye with a little bit of water.
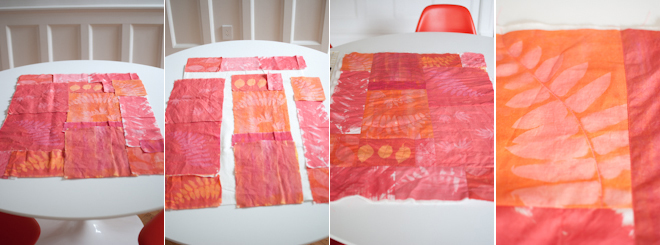
When we were finished dyeing, I started to think about what I could make with our fabric. I had plenty of fabric for a quilted bag and so with some Quilter's Dream Cotton Batting, I got busy. I lay a 23x46 inch peice of batting on the table and arranged the printed pieces of fabric right on top of it. I did not want an orderly pattern so I was a bit haphazzard in placing the pieces but, I did make sure that within all the randomness, I maintained 4 distinct rectangles that could be easily pieced together in the end.
Once I had sewed the seams and the batting was securely attached I did some more quilting: stitching in the ditch of the seams and also on the spines of the larger ferns and leaves. I stitched a grid over some of the maple leaves, and in the areas where I had experimented with strokes I sewed some diagonal lines that mimic the movement of the pattern. None of this was very precise but in the end I made sure that all of the fabric was quilted in some way or another, with stitching at least every 3-4 inches.
To construct the bag you can follow the directions for Molly's fabulous 40 minute tote on the PurlBee. I used the quilted fabric I made for the outside, 3/4 yard of Shot Cotton in Watermelon for the lining, and Gutterman's thread in color 4930 to sew it.
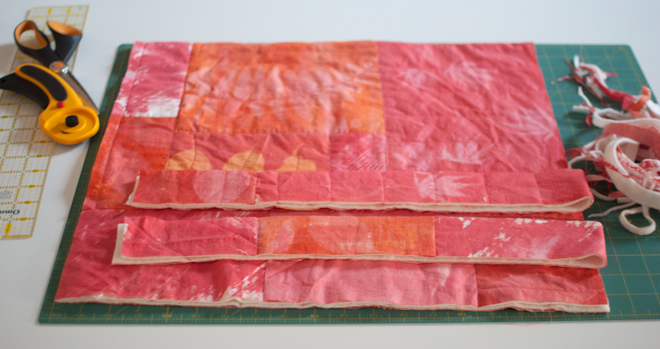
I trimmed the quilted fabric into a 23x34 rectangle and squared the edges so that I would have a neat piece to work with before I started sewing. I cut two 2x34 inch strips from the long sides of the rectangle to make the straps (I opted to make my own rather than use webbing like Molly did for her bag). I cut one strip off each side of my rectangle because that left the nicest design on the main piece for the bag but you can cut both off one side if you prefer. The remaining piece of quilted fabric was 19x34 inches. I cut two strips of the shot cotton measuring 2x34 and 1 piece measuring 19x34 for the bag lining. Molly's bag is not exactly the same size as mine but the instructions still apply; in her directions she calls for two pieces for the bag and another two for the lining but I just used 1 piece that was twice as long and folded it in half.
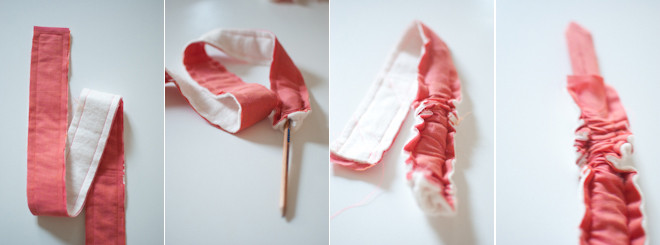
To make the straps, pin the quilted strips and the cotton strips right sides together and sew with a 3/8 inch seam allowance leaving one small end open. I used a pencil with an eraser to turn the tubes inside out by gently tucking the sewed shut end into the tube and using the eraser end of the pencil to poke it up into the tube. Working slowly you can ease the pencil up and the scrunched up end down gradually turning the tube right side out. Once the tube is right side out you can trim off the bulky end that was sewn shut so the strap is 28 inches long.
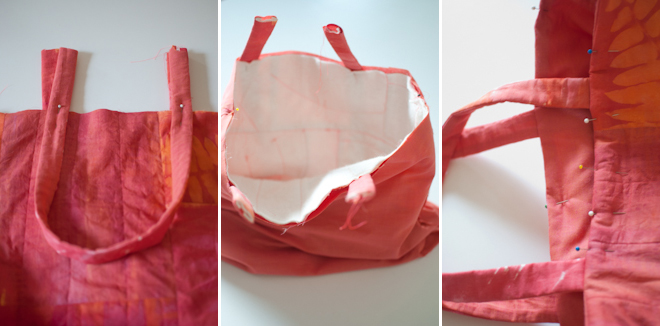
I sewed the side seams of my bag and lining and followed Molly's directions for sewing the corners to make the boxed bottom. She also gives clear instruction for how to assmeble the bag, straps and lining. You can see my photos of that process above. I added one additional step at the end: I sewed along the edges of the straps and down onto the bag where the straps were concealed to add one more quilting detail...you can see that in the photo on the right.
I definitely look forward to more experimenting with these dyes. It was loads of fun and there are tons of things left to try! Maybe the next time we will try blues! I'll keep you posted...
 kids crafts,
  purlsoho,
  sewing in
  ACTIVITIES,
  PROJECTS
Reader Comments (17)
Wow! What an amazing project. The kids designs are wonderful and I love the bag you produced from all the art work. Just gorgeous :D
The bag is just gorgeous! I loved to read about your process, the helpers and result.
Luciana
I love this! I have been seeing this dye on a couple of people's blogs and got really excited and wanted to order from the dye's actual website. Got distracted and yesterday was doing an order on the bee and then this morning saw your post and just had to add the ink to my order! Lovely project to share with the kids and I can't wait to see what my kids will do with this! Beautiful blog post!
Beautiful! Loving your site! I am just getting into quilting and was wondering what type of machine you use?
Thank you all so much!
Tara, I bought a second hand Pfaff machine that I love but have used an really inexpensive brother that was great too.
this is mind-blowing! I love it and have to do it with my boys! I used to have so much fun with 'sun prints' using just paper so this is really exciting!
I love this! How did you get the owl to work in the blue?
Seriously cool bag you made!
Hi Dana,
I let the kids experiment with all kinds of objects to make silhouettes. The owl was from an inexpensive set of stencils from Michael's. We also used some Martha Stewart craft punches, feathers, sequins, gromets, etc. (all of these items are also available at Michael's). Have fun experimenting! Amy
Although this Inkodye project is obviously great fun for kids and moms and the results are terrific, I'm looking forward to sharing this project with my fellow grandma friends. Suzie
That bag is so beautiful. Can't wait to see it in person :) Love!
This project is absolutely gorgeous. I read about Inkodye on their Kickstarter page a month or so ago but seeing people use the dyes for their own projects really intrigues me; I love how you turned an afternoon with your family into a beautiful product.
A+ would read again :)
This is great! I used to dye muslin years ago and just recently purchased some dye to start again to make my own fabric for a quilt. When I saw what you and the children had done just inspired me more than ever to get started. Good job! It's nice you get your kids involved. It is something they will never forget.
This is great! I used to dye muslin years ago and just recently purchased some dye to start again to make my own fabric for a quilt. When I saw what you and the children had done just inspired me more than ever to get started. Good job! It's nice you get your kids involved. It is something they will never forget.
This is great! I used to dye muslin years ago and just recently purchased some dye to start again to make my own fabric for a quilt. When I saw what you and the children had done just inspired me more than ever to get started. Good job! It's nice you get your kids involved. It is something they will never forget.
Wow I love the colors you were able to produce! Currently they only sell red blue and orange inkodye and while I've been playing with it I have not been able to get the color range that you have... so if I may ask how did you do it? :) Thanks!
Hi Sydney,
I just received your question regarding inkodye. I am so glad that you were inspired to try it!
Unfortunately the company has really pared down their color offerings since I did my post. At that time I had purchased about 9 colors which are all reflected in the striped sample we made. However, most of the pieces I used for the bag were variations that could be created with red and yellow (or orange - now that I say that I think the orange was pretty pale).
I also experimented with watering down the colors, and I combined them too, in order to get various shades of pink and orange for the fabric I dyed for the bag. In some cases I exposed the fabric with one color, and the leaves, and then removed the leaves and exposed it a little more...that is how I got the pale pink on darker mink leaves. Or, in others I did a thin wash of dye to get an under layer, and then exposed it again with another color and used the leaves...for example did a quick exposure of watered down red without any leaves, and then painted on a coat of orange on top and exposed again with leaves covering parts. That worked really well.
I hope you have success. I really enjoyed playing with it and hope to try again with some other ideas one of these days!
Best, Amy
My name is Becky and I work for Lumi. Your Inkodyed handbag is beautiful, and I was wondering if we could showcase it at an upcoming event we have.
If this is something you would be interested in, please email me back at becky@lumi.co.
Thanks! I look forward to hearing from you.
Becky