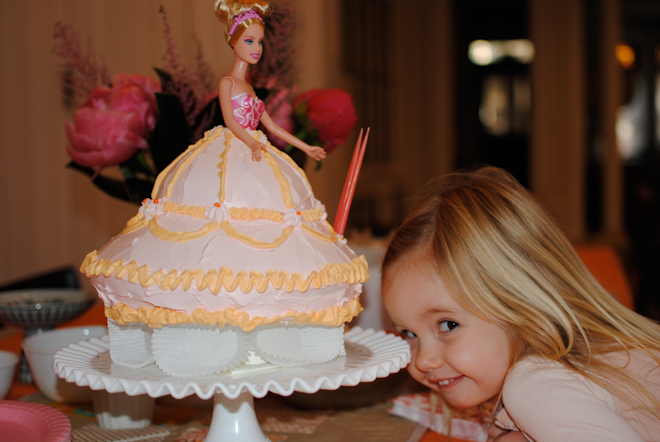
Although I loved baby dolls as a little girl I never liked Barbie. As I got older I learned to dislike her for all she represented, but long before that, I just didn't get how to play with her and did not understand why so many of my friends loved her so much. As a result I was bewildered, and a little dismayed, when my daughter became obsessed with her before her third birthday. I think it started while we lived in Cape Town, South Africa: we would visit the local video store and Bea (at age 2 1/2) would wander in and be drawn straight to the row of pink videos that I never would have even seen...they were at knee level for me but that was eye level for her. My sister encouraged me to let go of my own disdain and let Bea live out all her Barbie dreams. I listened, and for her third birthday she got her first Barbie doll as well as this Barbie cake. She loved it so much that she asked for another one when she turned 4. I had made my first Barbie cake about 10 years earlier when my young sister-in-law turned 5 or 6. Once you get over the initial horror it is actually a pretty fun cake to make. I used this Barbie because her leotard is painted on which works perfectly as the top of her dress, and she can be washed without doing any damage to her outfit.
The photo above is the first cake I made for Bea. I learned a few things...as you can see in the photo, I had a height issue. Barbie's unnaturally long legs were taller than my very tall cake layers! Her feet needed to stick right through the bottom in order to get the cake to start at the waist. Luckily I had an almost used up roll of duct tape and some cardboard rounds. I taped the tape roll to the cardboard round and cut a hole in the center for the feet to poke through. I had to cover this whole situation so tucked white cupcake papers around it. Not perfect, but it covered the mess!
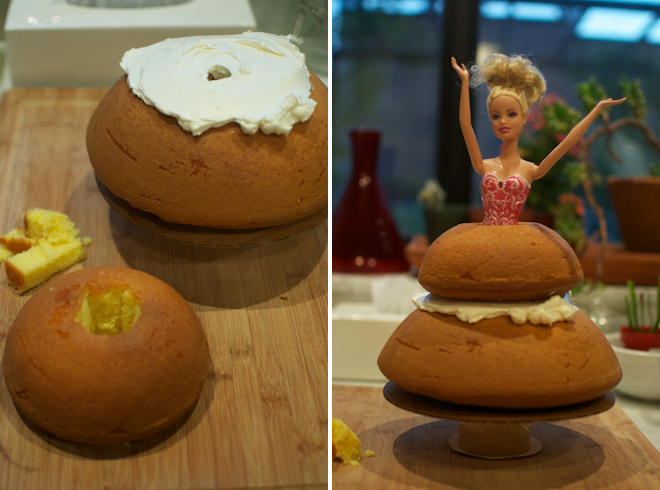
In order to get the full tiered skirt I baked two cake layers in metal bowls. Stack your bowls to get an idea of whether they will give you the shape and height you want. You will need to determine whether the bowls you are using need one recipe of cake batter or two. The easiest way to determine this is to fill regular round cake pans (as many as your batter calls for) with water about 2/3 full; then pour that water into the two bowls to see if it fills them about 2/3 full. If it does, then you should have no trouble. If it does not fill them you will need to double your usual recipe. You may end up with extra batter but you can bake it in another bowl or make a few cupcakes. By the way, here is a great chocolate cake recipe - it is super moist and keeps for days. Bea wanted a lemon cake and since I did not have a favorite recipe I saved myself the trouble and used a box mix for that one.
Once the cake is baked and cooled you will need to cut holes in the centers where you will insert Barbie's legs. In the photo below right you can see the tape roll under the cardboard round.
I use a variation on Martha Stewart's butter cream frosting recipe. The original recipe is very rich, and a cake like this which is heavily decorated and uses lots of frosting, so I cut back on the butter. The butter is what makes the frosting so firm and stable but I find that it still holds its shape very well with 75% of the butter. Everyone has different tastes...you can use your own preferences to decide how much to use. Also, this is a very large batch of frosting. You will not use all of it. I like to make a giant batch knowing that it leaves room for error - when I am mixing the colors I use a small bowlful at a time knowing I can add more plain frosting if the color gets too dark. Or that if I do something I really do not like I can scrape it off without having to make more frosting. If you are a confident decorator you can make a smaller batch of frosting and avoid the waste.

Once you have the layers stacked and the Barbie in place do a "crumb coat." By spreading a thin layer of frosting over the cake you give yourself a nice base to pipe on, and you seal in all the crumbs so that they do not get into your frosting. After you apply the crumb coat place the cake in the refrigerator for at least 15 minutes or until the frosting is firm.
You can vary the way you frost the cake to suit your whim. On the first cake (top photo) I just spread a layer of pink frosting on the whole skirt and then piped some yellow lines and ruffles on it to give it a little princess-like embellishment. For the 4th birthday version I opted for a layer of ruffles over most of the skirt.
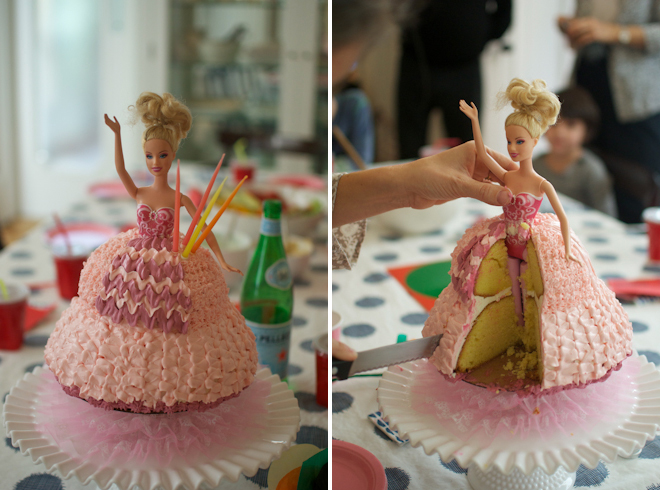
Initially the skirt was only pale pink and something made me add a little purple ruffle across the front. Not sure it really added anything though.
A few other tips: Long skinny candles (or candles with some sort of little holder on the end) are helpful so you don't have to make big holes when you sink them into the frosting. Also, hold onto Barbie as you start slicing the cake. The cake can get off balance pretty easily up on that tape roll and it would be a shame to have the whole thing topple over! Last but not least, if you want some frilly ruffles to tuck between your cake plate and the elevated cake I found this and was happy with how it filled the gap.


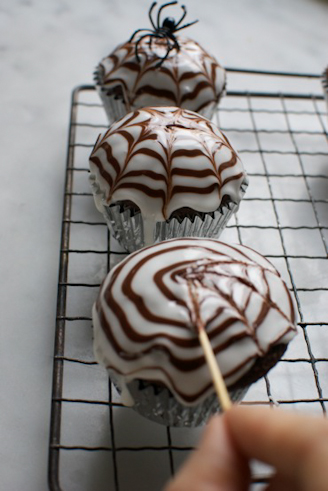 The decoration is way easier than it looks: The white frosting is made with a box of confectioners sugar and 5-8 tablespoons of milk. Combine 3 cups Confectioner's sugar with 4 tablespoons of milk. Add the remaining milk very gradually, checking the consistency as you go. You want the frosting to be thick enough that it coats the cupcake well and does not run off the top, but thin enough to give a smooth surface. When you think you have it about right test it on one of your cupcakes. If it is too runny add more confectioners sugar. If it is too thick, add a little more milk - just a few drops at a time. Melt chocolate chips in a bowl set over a pan of simmering water. Put melted chocolate in a piping bag with a small plain tip, or in a paper cone. Coat the cupcakes with the white frosting. Pipe a spiral of chocolate on top. Use a toothpick to create the web by starting in the center of the cupcake and drawing the point to the edge, repeating until the web is complete. Top with a plastic spider ring. I work in batches of 6 cupcakes to ensure that the frosting and chocolate remain soft enough to get the desired effect. Once the frosting starts to set the chocolate does not blend with the frosting to create the webs. (There is a wide margin for error, I promise!)
  Post a Comment