Entries in halloween (8)

Monday
Oct212013

halloween: mythical woodland creatures

In my kids early years it was sometimes a struggle to convince them that home made costumes were the way to go. We would pass shops full of ready to wear costumes and I would be greeted with whining and tears...why can't we buy that!?!?


Now that they are older and all in school all day I have filled my days with other projects and have less time to devote to things like Halloween so I opened up the idea of buying costumes this year...boy was that idea rejected quickly! Of course, I am thrilled that the love of making things has been passed down to my children but this year the pressure to perform set off a total panic attack for me.


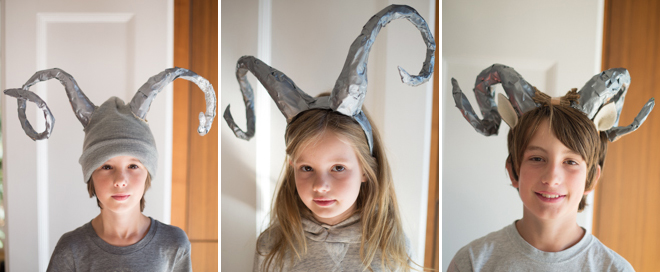
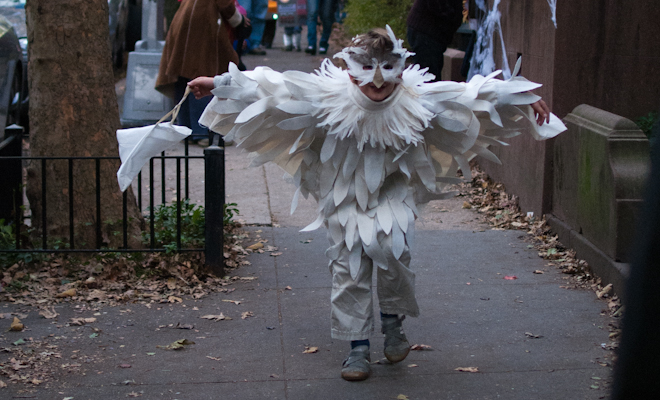
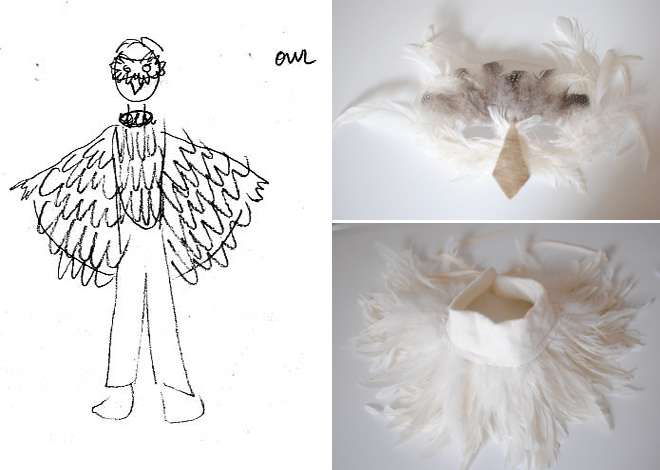
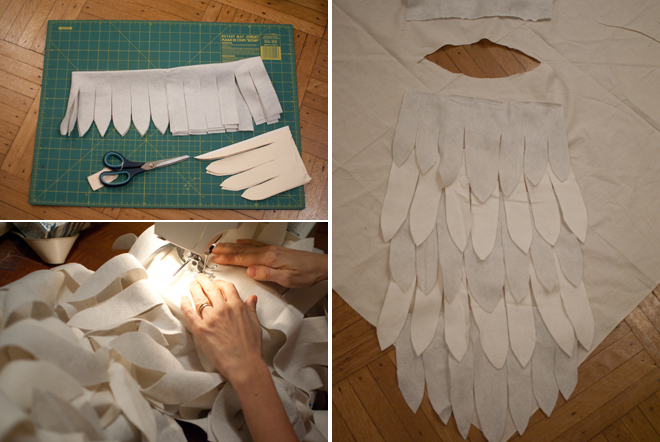
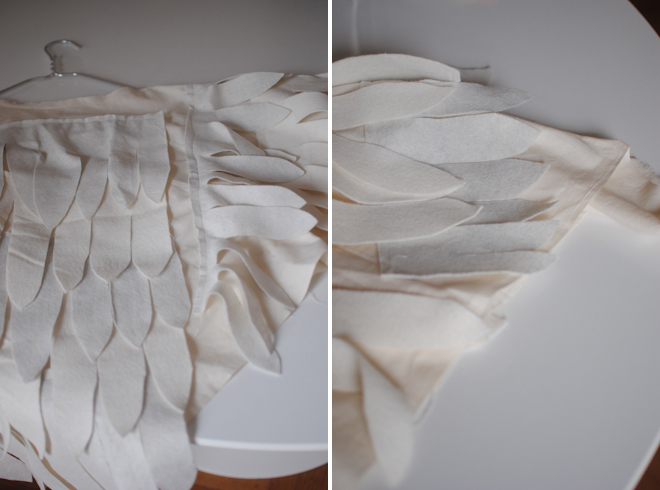
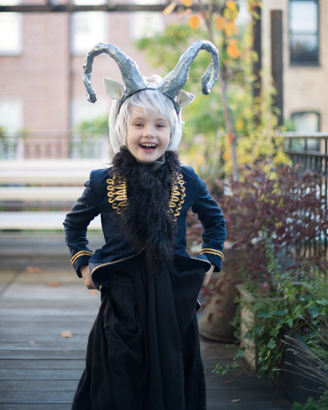
One of the hardest parts of Halloween planning for me is negotiating with the kids about what to be - their fantasies and my costume making skills are not always in line. This year Owen decided he wanted to be a satyr and set to work researching how to make his costume. He found all kinds of inspiring photos online and even a few how to's for making the legs but I was still worried: the sewing involved to make fur pants that would fit over the newly sculpted animal legs is way beyond my skill level! Then we happaned across this video that gives a brilliant way to make animal horns for a costume. I was so thrilled...it only used readily available materials and the skills needed seemed appropriate. I gathered the whole family around to suggest we embrace this as our theme and much to my delight all agreed. We were able to gather the supplies and make 5 sets of horns all by the end of the day. In fact, the kids worked so quickly that I struggled to get photos of all the step!


We agreed that the horns will unify us but the specifics of what we will wear with them will be unique to each...Oliver is leaning in the Minotaur direction while Bea is fawn meets queen. She is the only one to have fully hammered out the details of her costume (photo at top of post). She fell in love with this cheap wig we had in our costume box from a past year and combined that with as many dark and glamorous peices of clothing as she could dig up. The military jacket is the one item I managed to buy while contemplating a store bought Halloween...it is from H&M.


Wednesday
Oct262011

halloween costume: ladybug


Bea's first Halloween was the year the boys opted to be a spider and a bat so in keeping with that theme she was a ladybug. We had some sheets of foam left over from a project Adam was working on which made this costume very easy. I cut two semi sircles from the foam to make the shape of the wings.  I layed out some red fabric and folded it in half, inserting a foam wing so the straight side was against the fold. Then I layed out 5 black dots on each wing, pinning the dots to the red fabric where I wanted them. I sewed on the dots first, and then repositioned the foam. I sewed around the edges of the foam, as closely as I could using my sewing machine, and then just trimmed the excess fabric off around the edges. 


I dressed Bea in a black sweatshirt and sweatpants from American Apparel (our go to base for this kind of costume) and then cut a very simple vest out of a small scrap of black fabric. I made a rectangle about the size of her back first. I then cut a second rectangle for the front and cut it in half so it opened down the middle. I used a few little strips of cloth to make shoulder straps and some smaller square side panels to connect the front and back pieces. A couple more strips at the front tied the vest closed. Once the vest was finished I sewed the wings to the back of it.


Monday
Oct242011

skull cupcakes


My friend Jodi came up with these brilliant marshmallow skulls for Martha Stewart Living. As soon as I saw them I knew my kids would love them. My boys still bring a treat to school for their birthday and these skulls on top of a mini cupcake are perfect. One cake recipe makes enough mini cupcakes for both boy's classes and the skulls more than make up for the tiny portions. The directions call for chocolate sprinkles but we used the multi colored ones that I already had. Best of all, the skulls are easy enough to make that the kids got to help too.


Wednesday
Oct192011

halloween costume: bat


The year that Oliver was a spider, Owen was a bat. Bea was just under a year old and I was very busy with twin 5 year olds and a mobile little one, so there was not a lot of time for elaborate costumes. Like the spider, this one is quite easy. I bought about a yard of black flannel. In keeping with my "do the least possible while still making a costume" attitude I folded it in half diagonally and cut it into two triangles. I dug up some foam* that Adam had used for another project and cut eight long strips which I placed on the triangles to create sections. I placed two of the strips on the outer edges of the wings and folded the fabric over it, sewing it to secure. I used the remaining pieces to divide each wing into thirds, and cut strips from a remnant of a dark patterned fabric which I sewed over the foam to conceal it.


*NOTE - If you do not have a big piece of foam lying around I am sure other things would work for this...the idea is to simultaneosly give the wings some structure and make them a little more life-like and visually interesting. I bet thin strips of cardboard would work pretty well in a pinch.  


Once the basic wing structure was complete I used pinking shears to cut arcs between the foam points (see detail above left). Once the two wings were done I sewed them together and attached another scrap of fabric in the center so it could tie around the neck like a cape. I sewed black elastic along the outer edges so that the wings could be attached at the wrists and ankles (photo above right). Note: The photo of Owen wearing the bat wings was taken last week...the "wrist straps" are now practically at the elbows, and the "ankle straps" did not even come close to fitting around his ankles! If you make this costume make the wings first and then hold them up to your child to see where the elastic needs to be added.

Monday
Oct172011

halloween costume: chicken

My friend Jodi created this brilliant chicken costume for Martha Stewart's Kids magazine. When Lila was a baby Lauren dressed her in this costume for her first Halloween and she won first prize in a local costume photo contest by Roberto Falck. The photo (left) was taken by Roberto that day.


The costume is so simple to make - you just dress your baby in a white one piece and white tights or pants and wrap a white feather boa around the torso, securing it with safety pins. A pilot cap is adorned with a comb made from a small piece of red felt - that is the only sewing involved. Yellow rubber gloves make great chicken feet.


Lauren plans to dress Noah as a chicken this year...so cute!


Monday
Oct102011

halloween costume: owl


Of all of the halloween costumes I have made over the years I am most proud of this one. As a matter of fact, I may wear it myself this year! Owen's obsession with Harry Potter began last year and that combined with his fascination with birds led him to want to be an owl. 


I too share a love of birds so it was a fun one to think about. I started with this sketch, and while it helped me figure out a general plan I ended up constructing it differently once I had the material in front of me. I bought a yard each of white and pale grey felt and a yard of muslin at our local craft store...their website is limited but if you call the owner can help you if you want to order supplies. I also bought some really amazing feathers in the garment district that were all sewn onto a trim. This year I found a similar white feather trim here. If you are in NYC and can go in to the store I would recommend it, but if that is not possible they will do mail order. When I talked to the sales people they said you may need to send a photo for them to match so I have included a close up of the collar I made below.


The yard of muslin became the base of the costume, and because I always end up leaving things to the last minute and am short on time I did the least possible to it. I folded the muslin, corner to corner, to form a triangle and cut a neck hole in the center, forming a very basic poncho. 


At first I had been imagining wings that spanned Owen's back and then some sort of breast plate or bib for the front.  Once I decided to cut the muslin into a poncho that made the whole thing one piece, and actually a lot simpler to make.


I made a template from a manila folder and cut feather strips from both colors of felt. Then I sewed them in alternating rows down the front and back of the poncho. In order to cover the entire muslin I needed to space out the rows considerably...this also helped prevent the costume from getting too heavy and hot. The feathers for the front and back came to a bit of a point in the center. For the wing feathers I cut the strips similarly, but eliminated the tapering shape, opting to keep them uniform length instead. (see photos above)


Once all the felt feathers were cut I divided them up to be sure that I had enough for both wings. With open spacing I managed to cover the entire muslin, placing the wing feathers perpendicular to the chest feathers (photo above left). The opening for the head was not beautiful using this technique but luckily I had found that feather trim and had not used it yet. I sewed  a piece of felt over the poky ends and added ribbon so we could tie the collar on like a necklace. It covered the top opening beautifully and added a lot of drama to the costume.


You can see in the photo (above right) that the muslin points extend beyond the wing feathers. I cut a slit in the fabric just under the feathers for Owen to poke his hands through--this helped keep the wings centered over his arms. I also sewed seams down the front on either side of the chest feathers from the bottom up, leaving a generous amount of room at the top so it would fit around the armpits. This helped keep the poncho from rotating around his body. Just be sure there is plenty of room in the costume to get in and out easily. 


For the face mask I just bought a plain white mask and Owen and I glued feathers and a felt beak to it. Worn over his eyes, or on top of his head, it added the perfect finish.

Friday
Oct072011

spiderweb cupcakes


My boys were born at the end of October so we have had plenty of Halloween inspired birthday parties. These cupcakes impress young guests and they are quite fun to make.


The decoration is way easier than it looks: The white frosting is made with a box of confectioners sugar and 5-8 tablespoons of milk. Combine 3 cups Confectioner's sugar with 4 tablespoons of milk. Add the remaining milk very gradually, checking the consistency as you go. You want the frosting to be thick enough that it coats the cupcake well and does not run off the top, but thin enough to give a smooth surface. When you think you have it about right test it on one of your cupcakes. If it is too runny add more confectioners sugar. If it is too thick, add a little more milk - just a few drops at a time. Melt chocolate chips in a bowl set over a pan of simmering water. Put melted chocolate in a piping bag with a small plain tip, or in a paper cone. Coat the cupcakes with the white frosting. Pipe a spiral of chocolate on top. Use a toothpick to create the web by starting in the center of the cupcake and drawing the point to the edge, repeating until the web is complete. Top with a plastic spider ring. I work in batches of 6 cupcakes to ensure that the frosting and chocolate remain soft enough to get the desired effect. Once the frosting starts to set the chocolate does not blend with the frosting to create the webs. (There is a wide margin for error, I promise!) 


You can use whatever cake or cupcake recipe you love. I am partial to this one from Martha Stewart.

Wednesday
Oct052011

halloween costume: bunny


Felt really is my best friend at Halloween. Without any tedious hemming you can achieve a very finished looking costume. When shopping for felt be aware that there are a lot of different types -- you can find 100% acrylic felt for as little $7 a yard, and 100% wool felt (which is really gorgeous, but not necessary for a kids costume) for about $60 per yard. This costume took less than an hour to make and Bea was quite happy with it. I was too, except for the ears, which are a little too coquettish for me. 


To make this costume I had Bea lay down on a large piece of paper and I traced around her body to gauge the size. Then I cut three felt pieces: 1 in a standard tank top shape for the front, and two pieces with a curved edge seam to create the rounded back (see sketch below). NOTE: The straps in the sketch are too short...be sure to make them longer so you can adjust the size easily.


The back of the bunny did not stay rounded out on it's own so I tacked a small square throw pillow inside (photos below). The tail is a scrunchy wash ball from the drug store. Craft stores sell little squares of faux fur which we used along with some white felt for the ears. If I did this again I would be sure to set the ears apart a bit for a different look.


p.s. I intended to put a button and button hole on the straps but ended up just using safety pins instead.