Friday
Sep092011

smoked trout salad


As someone who is tempted to skip meals when solo, I find keeping the ingredients for a hearty salad a good solution for lunch on my own. All the ingredients in this salad keep well in the refrigerator, so this also works well for an impromptu lunch or dinner with friends.


Make a bed of greens on a plate and top with smoked trout, roasted beets, goat cheese, avocado and pecans. Drizzle with balsamic vinegar and extra virgin olive oil.

Wednesday
Sep072011

pasta with potatoes, green beans, and pesto


I think I am finally nearing the end of all the basil in the garden so I just made another big batch of pesto.


My first job after college was working in the art department of Glamour magazine where there was a very cool young Italian woman named Gloria who worked in the fashion department -- she first introduced me to this traditional Italian pasta dish. Gloria used broccoli but you can use broccoli or green beans interchangeably so use whichever you prefer, or whatever looks best when you shop. I thought the idea of potatoes in pasta seemed quite odd at first, but it is really delicious. Our basil plants did amazingly well this year so we ate this often over the summer.


You only use need one pot to prepare this pasta...something I have always appreciated since I do not love doing dishes nearly as much as I love cooking. The photo above uses fresh pesto made from our garden, haricots vert from a farm stand and gemelli pasta. The photo below uses fusilli, and broccoli. Both times I happened to have fingerling potatoes so I used them, sliced into 1/2 inch thick rounds, but any potatoes will work cut into a half inch dice.


The amounts for this recipe are not precise so you will have to bear with me...


I used 1 pound of pasta, about 2 or 3 cups of diced potatoes, and either 1 head of broccoli, cut into small florettes, or a bag of green beans (the equivalent amount to replace 1 head of broccoli), and a generous cup of pesto. Either store bought or homemade pesto can be used. Bring a big hunk of parmesan to the table to grate over the finished pasta.


The exact timing of this dish is really dependent on exactly what kind of pasta you use. Basically over cooked potatoes will be ok, but undercooked ones are not. Al dente pasta is ideal. And the broccoli or green beans can be bright and crisp, or soft and tender...it is delicious either way. To achieve this I always cut my potatoes fairly small, and cook them for 3 or 4 minutes before I add the pasta. Then I check the pasta package for the recommended timing and add the green beans about 3 or 4 minutes before it is done.  If you are using broccoli add it 4 or 5 minutes before the pasta is done. Drain the whole pot into a colander and shake off extra liquid. Return to a pot, add pesto, and toss to combine. 

Monday
Sep052011

making puzzles


I found these little blank puzzles at our local art supply store and included them in my tote bag of activities for a rainy day when we were packing up for our August vacation. The kids needed a little coaching on what makes a puzzle fun to do...e.g. coloring in each piece a solid color without crossing into the next piece is not the best plan. Once we talked about what does make it fun: looking for patterns or pieces of recognizable things, matching colors, etc. they got into it. I loved Lila's intensity (above) as she worked on hers.


I think this would be a great activity for a birthday party as well. I like to have something that the kids can do upon arrival since sometimes those first minutes are the hardest. Then they can take home their finished piece as a party favor. It definitely is a better activity for kids ages 5 and up though. 


Bea had a little trouble - you can see her trying her bird puzzle above. Since she had only used blue it was too hard but one we added some colorful borders and the word "bird" it was much easier.


Our young friend Ruby had fun participating too, but she did not exactly create a masterpiece. No waste though...Ben was happy to convert her scribbles.


Friday
Sep022011

blueberry focaccia


I love the blurry line between sweet and savory. Now, as blueberry season is coming to an end, I thought it would be fun to make a blueberry focaccia. The sweetness of the berries and the little bit of sugar sprinkled on top offset the olive oil, sea salt, and thyme perfectly.  I was not at all disappointed when the kids universally declared they did not like this one...more for the adults!


This would have been a a perfect baking project during hurricane Irene (assuming you did not lose power) since you need to stick around while the dough rises several times. From start to finish it takes about 5 hours to make but the active time is only about 20-30 minutes since each step requires minimal effort.


This recipe makes two loaves - partly because I hate using only part of a packet of yeast, and parlty because it is really just as easy to make 2 as it is to make one. This would be a perfect thing to serve if you are having a cocktail party, delicious with some nice cheese and wine. I also enjoyed it for breakfast with my morning coffee.


BLUEBERRY FOCACCIA

2 cups warm water

1 packet dry active yeast (mine was about 2 1/2 teaspoons)

1 tablespoon sugar

4 1/2 cups all purpose flour

1 teaspoon fine salt

1/2 cup plus 2 tablespoons extra virgin olive oil

3 cups blueberries

4 teaspoons fresh thyme leaves

2 tablespoons turbinado sugar

3/4 teaspoon coarse sea salt


Place warm water in a large bowl and sprinkle yeast and sugar over the surface. Set aside for 5 minutes or until yeast is frothy. (Note: If the yeast does not become frothy it is not active and needs to be discarded.)


Add 4 cups flour, 1 teaspoon fine salt, and 1/4 cup olive oil and stir until the dough has gathered into a rough ball. Sprinkle 2 tablespoons of the flour onto a clean work surface and turn dough out onto it. Knead it for a few minutes until it is nice and elastic - the dough will still be sticky. Coat the inside of a large glass bowl with another tablespoon of olive oil. Place dough in bowl, turning it over so that it is all coated with the oil. Place a clean dish towel over the top and set aside to rise until doubled in size, about 2 hours.


Remove dough from bowl and knead for a minute or two. Cut dough in half. Drizzle two sheet pans with olive oil and spread out to coat. Place one ball of dough on each tray, turning to coat with olive oil. Place a towel over each pan and set aside until the dough has risen enough that it is soft - about 30 minutes. Rub your fingers in the oil on the pan and press each piece of dough into a large oval, about 1 inch deep. Press your fingertips into the bread until it is covered with dimples. Cover with dishtowels and set aside to rise for another hour and a half.


Preheat the oven to 450°. Once it is hot, divide the blueberries, turbinado sugar, coarse sea salt, and remaining olive oil between the two pans, sprinkling each evenly over the surface. Bake for 15 minutes, until golden brown and bubbling. Allow to cool on a rack before serving.


Wednesday
Aug312011

baby back ribs


One summer treat we all enjoy is BBQ ribs. In fact, ribs have been one of Bea's favorite ways to eat meat since she was a baby. To make them, we use a modified version of an Everyday Food recipe that was published in the magazine in it's early years. The ribs are first coated with a spice rub and cooked in the oven, covered with foil, until the meat is tender and moist. I make my own BBQ sauce (it is a little thicker and stickier than the Everyday Food recipe) to coat the ribs before finishing them on the grill.


BBQ SAUCE

1  8 ounce can tomato sauce

1  7 ounce can tomato paste

1/4 cup honey

1/4 cup brown sugar

1/4 cup cider vinegar

1 large clove garlic 

1 teaspoon salt

1/2 teaspoon chili powder

1/2 teaspoon ground cumin

1 clove garlic, smashed 


Combine all the ingredients in a small saucepot and allow to simmer for 30-45 minutes until thick.


I know the cautious among us probably think it is terrible we let Noah gnaw on this bone. We checked it carefully to be sure there were no sharp bits or loose pieces of meat or cartilage and we watched him very closely to be sure he did not gag himself! Just like Bea, Noah loved it!

Monday
Aug292011

herb marinated goat cheese


Every year we have a multi-generational potluck gathering to celebrate the 4th of July. Friends Roy and Joel always bring a delicious array of homemade dips and chips that we all devour gleefully...I will try to get those recipes for a future post. This year they also brought a fabulous marinated goat cheese -- after the party was over we were chatting about the evening and realized that Page, Lauren, and I had all asked for the recipe!! It is simple enough to be passed on by word of mouth...take a log of inexpensive goat cheese (the inexpensive part was emphasized!) and gather any herbs you have in the garden or in your refrigerator (except for rosemary which is too woody) and roughly chop them. Add the herbs (we used about 1/2 cup), the zest and juice of a lemon, 2 cloves of minced garlic, and enough olive oil to generously coat the cheese (we used 5 or 6 tablespoons). Cover and refrigerate for several hours, spooning oil herb mixture over the top periodically to baste.

Friday
Aug262011

grilled clams with garlic butter


After Lauren and Ben spent a weekend with their friends Ellery and Kristy all they could talk about was the grilled clams Ellery made. The recreated the dish for a group of us last weekend and sure enough they were a hit. The one thing that we might change next time is the clams themselves - we used cherrystones and think smaller littlenecks would be even better. There is some range in size for both varieties so it is probably a good idea to ask to see them at the fish market and choose whichever looks like a perfect bite size.


The recipe is pretty simple but apparently you need a little practice shucking the clams once they pop open on the grill...Ben said Ellery made it look a lot easier than it really was! Before you get started soak the clams in very salty water - the clams should open slightly and release any sand that may be in the shells. For 2 dozen clams we sauteed 4 cloves of minced garlic in a little olive oil until it was soft, and added 4 tablespoons salted butter. Once the butter has melted keep the mixture warm - if you have one of those grills with a side burner this is the time to use it. Put the clams on the grill and close the lid. After 5-8 minutes you will hear them start to pop open. Use a clam shucking knife to open the shells the rest of the way and pry off the top. Run the knife under the clam to detach it from the muscle on the bottom. Use a pastry brush or teaspoon to generously coat the clams with the garlic butter. You can leave the clams to keep cooking on the grill while you work through the rest but if they look like they are getting too cooked move them to a cooler part. Once all the clams are ready transfer to a plate and serve immediately.


Wednesday
Aug242011

mountain paella with bernat


My good friend Bernat is from Barcelona and introduced us to "mountain paella." Apparently the better known seafood paella is actually an adaptation from this meat based original. Either kind of paella is still a traditional favorite and is often prepared for Sunday lunch, when families gather for a relaxed but festive meal.


Bernat is not only a great friend, he is also a great cook, and frequently when we spend time together it is in the kitchen cooking and eating together. I love learning about the foods from his culture and seeing how he makes them -- his father is a baker and often when he is cooking something he quotes tips his father has passed down to him.


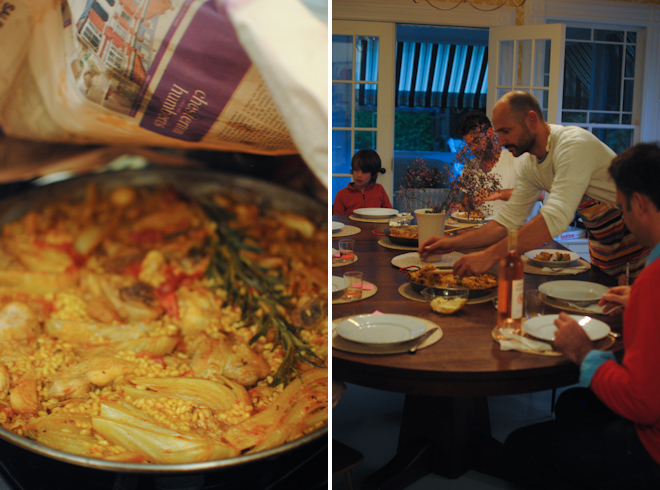
While Bernat made this paella (actually 2 since as usual we had a crowd gathered) I took meticulous notes. Much of what I found interesting was seeing the kind of things that are not always included in recipes because either they are too complicated to explain neatly, or because they are little tricks that are not crucial. I will include as many of these tidbits as I can...for example, notice the newspaper on the floor in front of the stove! When you are browning everything the oil splatters a lot so many Spaniards lay down paper so you don't end up with a slippery greasy floor.


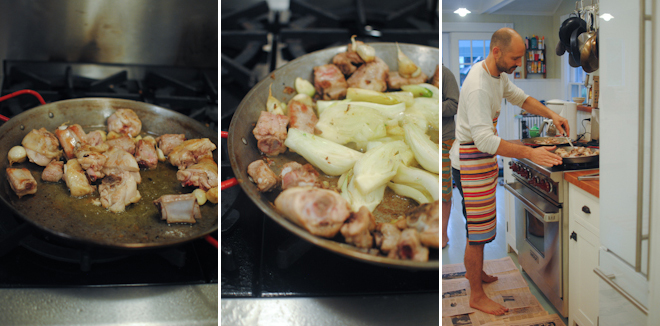
First, a few general notes. There is a reason that paella is served at Sunday lunch -- it takes quite some time to prepare, and although it is not difficult, you need to give it a lot of attention. Bernat and I took at least 2 hours to prepare this one. You also need a paella pan and a good gas burner. Paella pans are different than other skillets - they are very thin and flat and you are constantly moving the ingredients around the pan, first seeking out the hot spot when you are browning, and then moving the browned bits to the edges when you need to clear space for the next ingredient. For that reason the large surface area is really crucial. The pans we used measured 14 inches in diameter and each made enough paella to feed 4 adults. If your burner is too small you will need a diffuser which is the same size as you pan to place under it and spread the heat. According to bernat an electric stove will not do.


In my photos you will occasionally see 2 pans of paella - as I said, we made 2 to feed a crowd but the recipe below is for 1 paella serving 4 adults.
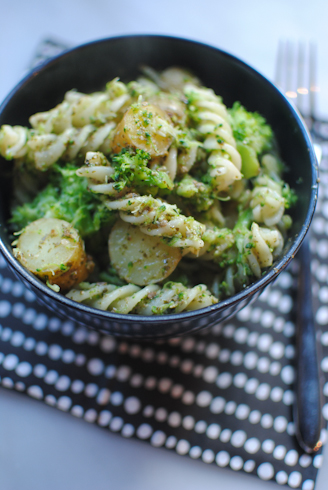
 

MOUNTAIN PAELLA


2 whole chicken legs 

3/4 pound spareribs

1 head garlic

2-3 tablespoons olive oil

1 fennel bulb, stems and fronds removed, cut into 1/2 inch thick wedges

1 cup drained butter beans

2 tomatoes

1 packet Paellero Valenciana (NOTE: SOURCE AND EXPLAIN SAFFRON + SWEET PAPRIKA SUBST.)

1 quart chicken stock

1 teaspoon salt

1 1/3 cups bomba rice (source)

1 sprig rosemary


Use a cleaver to cut chicken legs into 4-5 pieces and ribs into 1 inch lengths. Break apart garlic bulb removing excess papery skins but leaving on a thin layer -- this helps prevent the garlic from burning. Heat pealla pan over medium high heat and add oil. Add meat and brown on all sides, turning with tongs as needed. Add garlic cloves when meat is partially browned, being careful not to let the garlic burn. If the garlic started getting quite brown Bernat would put in on top of a piece of meat to prevent it from getting to dark and becoming bitter. You will notice that some areas of the pan are hotter than others to you will rotate things in and out of these spots as needed. 


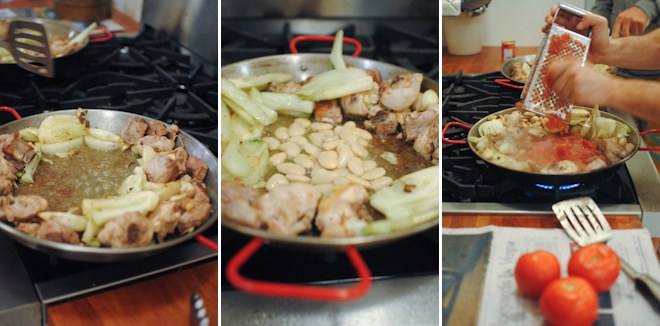
Once all the meat is browned move it to the edges of the pan, forming a ring, and add the fennel to the center to brown. Again, keep an eye on the garlic. 


When the fennel is softened and lightly browned move it to the edges of the pan and add the butter beans. Once the beans have some color they too get moved to the edges. Using a box grater, grate the tomatoes into the cleared center of the pan.


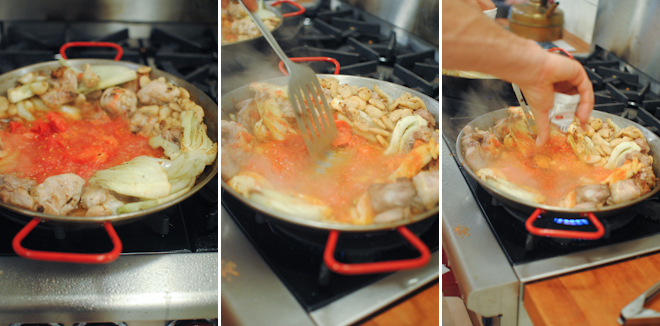
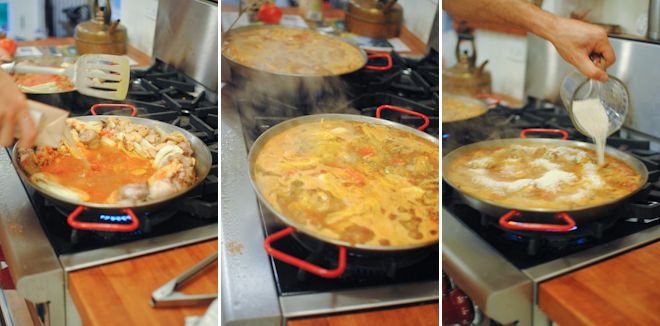
Allow to simmer and reduce until you can see the bottom of the pan when you run a spatula across the center of the tomatoes. Add the spice packet and stir vigorously for a few seconds, until aromatic, and them immediately add the stock.


Now you can rearrange all the ingredients so they are evenly distributed in the pan. At this point take note of how high on the pan the liquid is. Add 1 cup of water and salt and allow to reduce until you are back to that level.


Sprinkle the rice over the surface and use a spatula to help it settle to the bottom. Once you have submerged all of the rice add a sprig of rosemary and do not touch the paella again for 20 minutes.


The liquid should be boiling gently...if it is boiling out of control turn down the heat a little. If the pan or burner is uneven then rotate the entire pan on the burner without disturbing the contents. If it seems that the liquid in reducing to quickly turn down the heat so the rice has time to cook. 


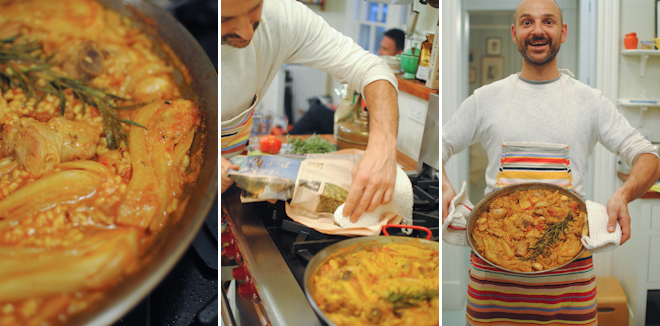
After 20 minutes the paella will appear dry -- all the liquid will have evaporated or been absorbed. Turn off the heat and wrap the pan with newspaper to cover completely, being careful not to burn your hands, and let rest for 10 minutes. 


Monday
Aug222011

banana bread with mascarpone and honey


A few years ago our family spent 6 months living in Cape Town, South Africa. During that time we had a favorite breakfast spot where we always ordered the same thing: soft boiled eggs with soldiers for Adam ("soldiers" are little strips of toast, cut so that they can be dipped into the runny yolk), and toasted banana bread with mascarpone and honey for me. It was divine! When I made this banana bread there was no need to toast it...everyone insisted on eating it before it had even fully cooled. 


BANANA BREAD

1 stick unsalted butter, softenned

1 cup firmly packed brown sugar

3 very ripe bananas, mashed

1 teaspoon vanilla extract

2 large eggs, lightly beaten

1 1/2 cups flour

1 teaspoon baking soda

1 teaspoon ground cinnamon

1/2 teaspoon salt


Preheat oven to 350°. Grease and flour a loaf pan and set aside. Cream together butter and brown sugar in a large bowl. Add mashed banana, eggs, and vanilla and stir to combine. Add flour, baking soda, cinnamon, and salt and stir to combine. Pour into prepared pan and bake for about an hour, or until a toothpick inserted into center comes out clean. Set aside to cool for 10 minutes before unmolding onto a cooling rack. 


Slice bread and top with mascarpone and a drizzle of honey.

Saturday
Aug202011

basil lemon soda & watermelon basil cooler

Basil syrup mixed with seltzer and a squeeze of lemon or lime makes a delicious soda. It can also be used with lemon juice and water to make basil lemonade.


After we made our syrup I picked up a small watermelon at a farm stand but got home and discovered that there was no room for it in the refrigerator. We decided to put it in the blender and make watemelon juice. Add it to the basil lemon soda for a beautiful and very refreshing drink.


By the way, I've added a new page to the blog. You may have noticed the Photo Gallery tab at the left already, but if you haven't please take a look!