Tuesday
Oct182011

warm mushroom salad


In the fall and winter months I love making salads with a warm component: roasted or sauteed vegetables, or a warm vinaigrette. In this case the earthy flavor of mushrooms combine well with some nice crisp apples (from our recent apple picking). I can't lie...the kids were not fans of this one...but sometimes I need to cook for the grown ups! I started with a bed of micro arugula, some sliced crisp green apples, dried cranberries, and toasted pecans. I sauteed some sliced red onion and gorgeous little shitake mushrooms (remove the tough stems first) in olive oil and seasoned them with a little salt and pepper. When the mushrooms were nicely browned I added few tablespoons of balsamic vinegar and poured the mixture over the salad. Toss until the leaves are all dressed and serve.

Monday
Oct172011

halloween costume: chicken

My friend Jodi created this brilliant chicken costume for Martha Stewart's Kids magazine. When Lila was a baby Lauren dressed her in this costume for her first Halloween and she won first prize in a local costume photo contest by Roberto Falck. The photo (left) was taken by Roberto that day.


The costume is so simple to make - you just dress your baby in a white one piece and white tights or pants and wrap a white feather boa around the torso, securing it with safety pins. A pilot cap is adorned with a comb made from a small piece of red felt - that is the only sewing involved. Yellow rubber gloves make great chicken feet.


Lauren plans to dress Noah as a chicken this year...so cute!


Thursday
Oct132011

apple picking


Every year we seem to find some time to go apple picking. Picking berries and other fruit is fun, but the great thing about apples is that the kids love them so they usually all get eaten. I like to think of ways to incorporate them into my cooking as well...certainly the oatmeal with carmelized apples is one way, but I also add them to salads and soups, or throw a few wedges in the roasting pan with vegetables, chicken, or pork. Of course, apple desserts are pretty great too! I am sure a few recipes will pop up here in the coming weeks.


Wednesday
Oct122011

oatmeal with caramelized apples


In general I am not a big breakfast eater. Ideally, I like to eat my first meal at around 10am. That said, I love oatmeal and find it one of the more pleasant meals to start the day with. In the fall when apples are abundant I like to pair steel cut oatmeal with sauteed apples. Adding a little maple syrup to the pan once the apples have been browned in butter makes a delicious topping for a hearty breakfast.


Monday
Oct102011

halloween costume: owl


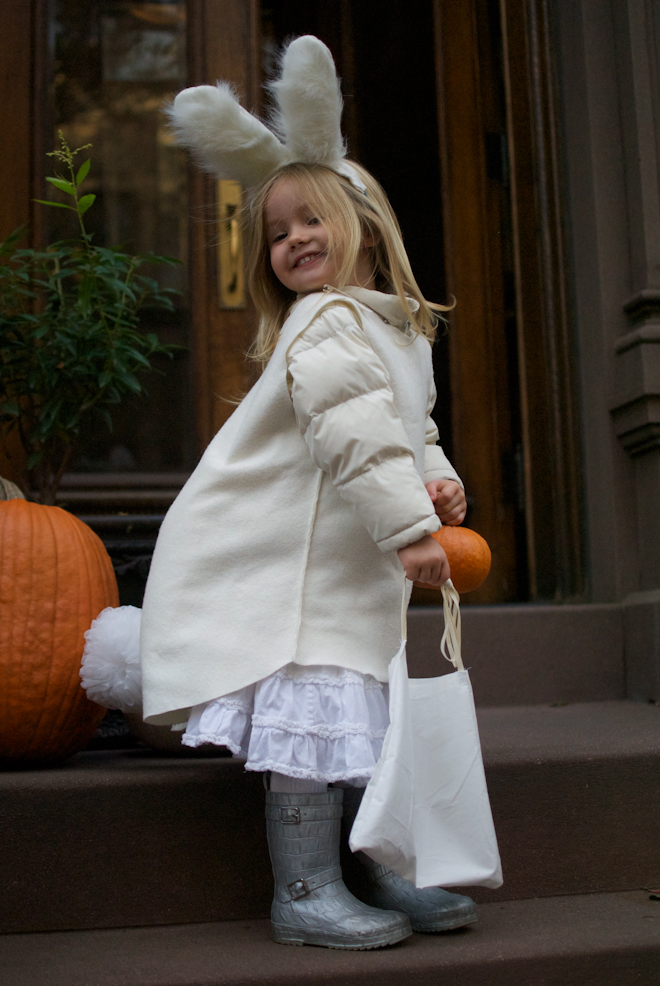
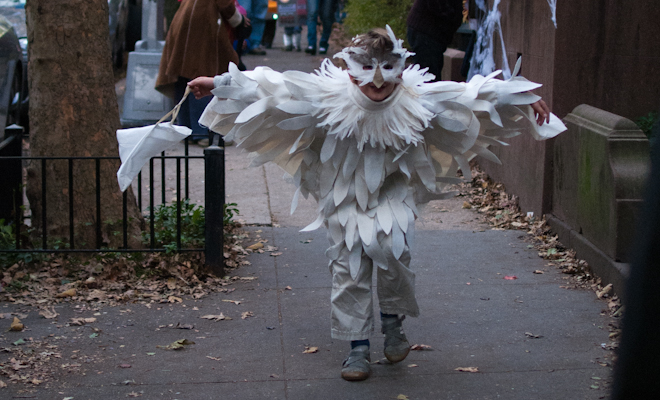
Of all of the halloween costumes I have made over the years I am most proud of this one. As a matter of fact, I may wear it myself this year! Owen's obsession with Harry Potter began last year and that combined with his fascination with birds led him to want to be an owl. 


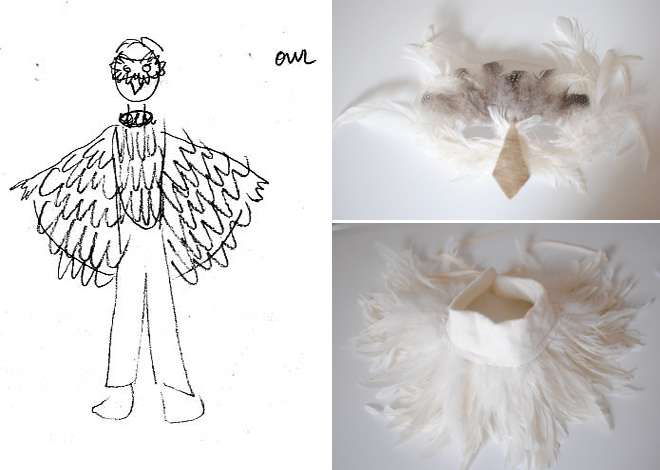
I too share a love of birds so it was a fun one to think about. I started with this sketch, and while it helped me figure out a general plan I ended up constructing it differently once I had the material in front of me. I bought a yard each of white and pale grey felt and a yard of muslin at our local craft store...their website is limited but if you call the owner can help you if you want to order supplies. I also bought some really amazing feathers in the garment district that were all sewn onto a trim. This year I found a similar white feather trim here. If you are in NYC and can go in to the store I would recommend it, but if that is not possible they will do mail order. When I talked to the sales people they said you may need to send a photo for them to match so I have included a close up of the collar I made below.


The yard of muslin became the base of the costume, and because I always end up leaving things to the last minute and am short on time I did the least possible to it. I folded the muslin, corner to corner, to form a triangle and cut a neck hole in the center, forming a very basic poncho. 


At first I had been imagining wings that spanned Owen's back and then some sort of breast plate or bib for the front.  Once I decided to cut the muslin into a poncho that made the whole thing one piece, and actually a lot simpler to make.


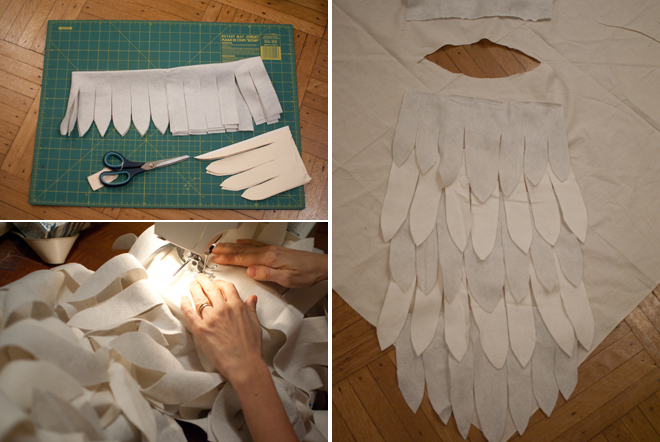
I made a template from a manila folder and cut feather strips from both colors of felt. Then I sewed them in alternating rows down the front and back of the poncho. In order to cover the entire muslin I needed to space out the rows considerably...this also helped prevent the costume from getting too heavy and hot. The feathers for the front and back came to a bit of a point in the center. For the wing feathers I cut the strips similarly, but eliminated the tapering shape, opting to keep them uniform length instead. (see photos above)


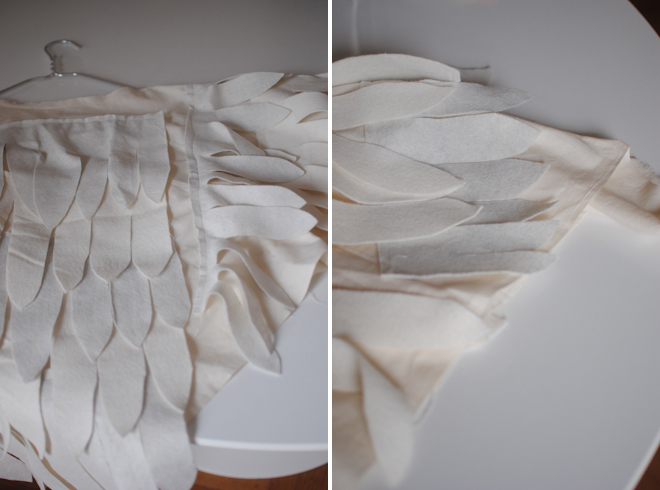
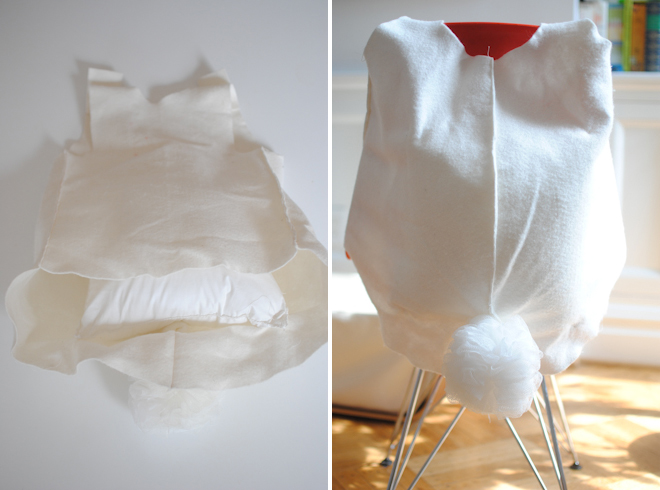
Once all the felt feathers were cut I divided them up to be sure that I had enough for both wings. With open spacing I managed to cover the entire muslin, placing the wing feathers perpendicular to the chest feathers (photo above left). The opening for the head was not beautiful using this technique but luckily I had found that feather trim and had not used it yet. I sewed  a piece of felt over the poky ends and added ribbon so we could tie the collar on like a necklace. It covered the top opening beautifully and added a lot of drama to the costume.


You can see in the photo (above right) that the muslin points extend beyond the wing feathers. I cut a slit in the fabric just under the feathers for Owen to poke his hands through--this helped keep the wings centered over his arms. I also sewed seams down the front on either side of the chest feathers from the bottom up, leaving a generous amount of room at the top so it would fit around the armpits. This helped keep the poncho from rotating around his body. Just be sure there is plenty of room in the costume to get in and out easily. 


For the face mask I just bought a plain white mask and Owen and I glued feathers and a felt beak to it. Worn over his eyes, or on top of his head, it added the perfect finish.
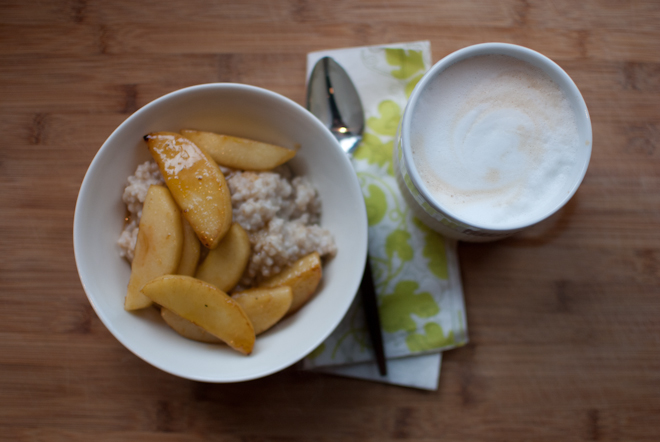
Friday
Oct072011

spiderweb cupcakes


My boys were born at the end of October so we have had plenty of Halloween inspired birthday parties. These cupcakes impress young guests and they are quite fun to make.


The decoration is way easier than it looks: The white frosting is made with a box of confectioners sugar and 5-8 tablespoons of milk. Combine 3 cups Confectioner's sugar with 4 tablespoons of milk. Add the remaining milk very gradually, checking the consistency as you go. You want the frosting to be thick enough that it coats the cupcake well and does not run off the top, but thin enough to give a smooth surface. When you think you have it about right test it on one of your cupcakes. If it is too runny add more confectioners sugar. If it is too thick, add a little more milk - just a few drops at a time. Melt chocolate chips in a bowl set over a pan of simmering water. Put melted chocolate in a piping bag with a small plain tip, or in a paper cone. Coat the cupcakes with the white frosting. Pipe a spiral of chocolate on top. Use a toothpick to create the web by starting in the center of the cupcake and drawing the point to the edge, repeating until the web is complete. Top with a plastic spider ring. I work in batches of 6 cupcakes to ensure that the frosting and chocolate remain soft enough to get the desired effect. Once the frosting starts to set the chocolate does not blend with the frosting to create the webs. (There is a wide margin for error, I promise!) 


You can use whatever cake or cupcake recipe you love. I am partial to this one from Martha Stewart.

Wednesday
Oct052011

halloween costume: bunny


Felt really is my best friend at Halloween. Without any tedious hemming you can achieve a very finished looking costume. When shopping for felt be aware that there are a lot of different types -- you can find 100% acrylic felt for as little $7 a yard, and 100% wool felt (which is really gorgeous, but not necessary for a kids costume) for about $60 per yard. This costume took less than an hour to make and Bea was quite happy with it. I was too, except for the ears, which are a little too coquettish for me. 


To make this costume I had Bea lay down on a large piece of paper and I traced around her body to gauge the size. Then I cut three felt pieces: 1 in a standard tank top shape for the front, and two pieces with a curved edge seam to create the rounded back (see sketch below). NOTE: The straps in the sketch are too short...be sure to make them longer so you can adjust the size easily.


The back of the bunny did not stay rounded out on it's own so I tacked a small square throw pillow inside (photos below). The tail is a scrunchy wash ball from the drug store. Craft stores sell little squares of faux fur which we used along with some white felt for the ears. If I did this again I would be sure to set the ears apart a bit for a different look.


p.s. I intended to put a button and button hole on the straps but ended up just using safety pins instead. 

Monday
Oct032011

sheep and wool festival


Last year I had the pleasure of going to the Rhinebeck Sheep and Wool Festival for the first time. I had heard about it from various yarn loving friends over the years, so when I heard that my dear friend Page and her Purl Soho partner Joelle Hoverson were going (Joelle was doing a book signing for her book More Last Minute Knitted Gifts) I asked if I could join them. 


In the end Page and I decided to bring our families, and although I felt like I was asking Adam and the kids to tag along on something that was clearly all about me, we all had a fantastic time. We started out admiring the sheep, goats, and alpacas -- they have such whimsical faces that I could have taken a hundred photos. Then, while Page and Joelle and I spent way too much time pouring over all the beautiful wool in all its various forms, the kids and dads got to sample lots of sweet treats, listen to music, and play games. They even went to an airshow at the nearby Old Rhinebeck Aerodrome. At the end of the day we found the amazing animals created from fleece that the kids are holding in the photo at the top of this post. They are their favorite stuffed animals to this day, and have already asked if they can each choose another this year.


The photos above are just a few of the many things I could not resist buying. The photo on the left is skeins of wool roving...I had admired one just like it hanging from a knob in the living room at Page's house before we went to the festival and was so happy to find it and copy her!  The photo on the top right is more roving, just presented differently. The pale grey spiral on the bottom right is actually an enormous bag full of carefully combed roving that I plan to crochet into a rug...we will see when I actually get to that project. I am slightly terrified of ruining it!


I think this may be an annual tradition for Page and me and our families...I know we will be going back this year on October 15th...my kids have been asking about it since June. It is a great way to get out of the city on a beautiful fall day. All the details of the festival can be found here.

Friday
Sep302011

halloween costume: robot


These robot costumes were loads of fun to make, and just the other day the boys told me they think they might have been their best costumes ever. When I worked at Martha Stewart Living I was constantly amazed at the ideas that various editor friends would come up with for costumes...I was particularly intrigued by the ones that were created from either supermarket or hardware store finds.


My friend Jodi created a masterpiece out of coffee filters (shown above left...that is her modeling the costume on the right) for a story on "no sew" costumes. Another year my friend Matthew did a story called "Space Odyssey 2001" which included an amazing styrofoam cup helmet (shown below). I tried to channel Jodi and Matthew when we took the boys to Lowe's to hunt for matierials to make their robot costumes.  The boys were also very excited as they searched the aisles, throwing every shiny or battery powered item they could find into our cart.


When we went shopping for materials we had a vague plan but a lot evolved based on what we found. Originally we thought that the aluminum dryer vent tubing would work for both arms and legs and I must admit that when I see the boys' skinny little legs poking out of the oversized bodies they look a little imbalanced, but overall I was pleased with how the costumes turned out. Since the dryer vent tubing was too bulky and hard to walk in, not to mention difficult for the boys to get in and out of, we got them silver leggings from american apparel instead.  


For our costumes we made body armor from insulation material. One of the things that was a little tricky to figure out was how to make the costumes so they could get in and out of them easily. The boys wanted to try them on and play with them a bit in the days leading up to halloween so I needed to be sure they were not designed for a single use. I found two things worked well: nuts and bolts, and adhesive velcro. You can see how I used the nuts and bots in the photos above...they added a cool industrial appearance to the pieces too. I just cut small holes or slits in the insulation and used flat metal disk washers on either side so that the bolts would not just slide through.  I used nuts and bolts where mobility was crucial...for example on the mask we made goggles that attached to the helmut this way so they could get lowered or raised by the boys. 


Having too many nuts to attach was labor intensive at dress up time so I used them sparingly and added adhesive velcro where additional fastening was needed (photos below). I also found very shiny silver tape that was perfect for any seams that did not have to open and close...it is a little hard to see in the photos because it blends to well with the insulation material. I cut wedge shaped pieces of the insulation and taped them together to make the A-line wrap around skirt shown below--it was my attempt to join in the families theme. The shiny tape also worked well to attach battery powered lights and paint color samples which finished the looks.


In keeping with the theme I had planned for Bea to be a little girl robot. When she saw her cousin Lila as a cat she freaked out and wanted to be a cat too. Luckily a pair of ears (sewn to a silver headband) and some whiskers seemed to do the trick. Adam also loves Halloween and gets into the whole costume thing...playing the part of the nerdy inventor was not such a stretch!

Wednesday
Sep282011

grilled pork tenderloin


Growing up pork usually meant pork chops, and it was never really a favorite with me. Then as an adult I discovered the pork tenderloin. It is so simple to prepare and as long as you do not over cook it is never dry. I like to marinate the tenderloins for 30 minutes or so before cooking.


FOR THE MARINADE

1/4 cup tamari or soy sauce

1/4 cup olive oil

1 tablespoon sesame oil

2 tablespoons honey

1/2 teaspoon ground cinnamon

1/4 teaspoon ground ginger

1/8 teaspoon ground cumin

1 clove garlic, smashed


Heat the grill, or preheat the oven to 450°.

If grilling, cook with lid on, rotating loins to brown on all sides, until a meat thermometer registers 150°. Set aside to rest for 10 minutes. Slice and serve with chutney or mustard.


Alternatively you may brown the tenderloins in a hot skillet with a little olive oil. Once all sides are browned transfer skillet to preheated oven and continue cooking until a meat thermometer reads 150°.